So you’re considering an audio system to help your patients relax during scans. Congrats, you’ve come to the right place. The benefits for using an MRI audio system are many. To name just a few, there’s helping to
mitigate patient anxiety, doubling as
hearing protection, and
reducing scanner downtime.
But here’s the magic question: is an MRI audio system easy to use?
Absolutely. We firmly believe that the best audio system in the world is useless if it never gets adopted because it’s too time consuming or difficult for technologists to use. After all, they’ve got a scanner to run.
Here’s how using an MRI audio system works:
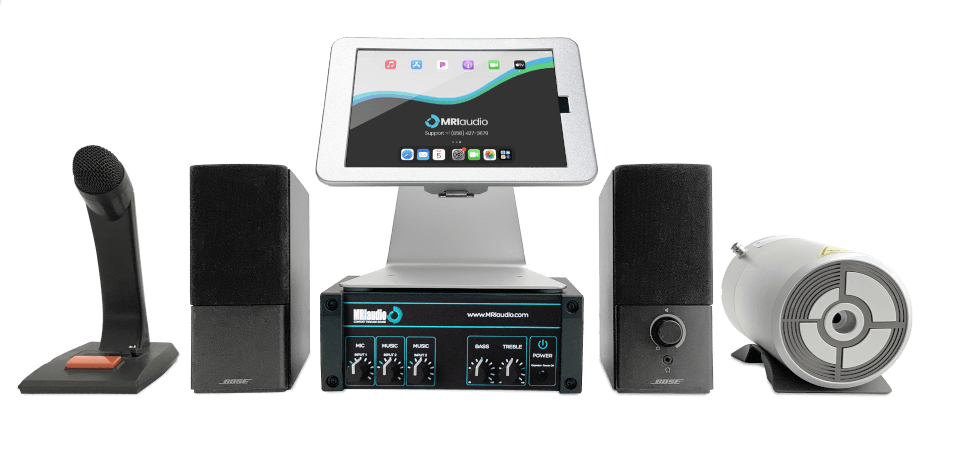
Step 1: Power up the MRI audio system
First thing’s first. You need power. Turn on your digital amplifier and iPAD. Once both are on, select the streaming service of your choice on the iPAD.
At this point, your patient should have already decided what they want to listen to during their scan. Pandora, Spotify, iHeart Radio all work so long as they’ve installed on the iPAD.
Next, turn the volume on the iPAD all the way up. Don’t worry, this isn’t the volume your patient is going to hear – no blown ear drums today.
Step 2: Get your patient ready
To prevent cross-contamination, we include cloth covers for over-ear headphones and foam ear tips for in-ear headphones. For over-ear options, adjust the head band for size and have your patient put them on their head. For kids, we recommend doing this part so they’re adjusted correctly. Check to make sure the ear cups cover the entirety of both ears and create a seal all the way around.
For in-ear headphones, have your patient gently insert the foam tips into their ears. Check to make sure the foam covers the entire ear canal and are firmly in place so they don’t fall out. Patients may find it helpful to gently pull on their ear lopes down and back to ensure the foam tip is inserted correctly. Again, gentleness is key.
Note that our over-ear and in-ear headphones act as hearing protection and are rated for 29 decibels of noise reduction.
Step 3: Adjust volume
Return to your amplifier and look for the Music Input 2 knob. This controls the sound volume for your patient’s headphones.
Use the technologist microphone to check in with your patient and make sure everything sounds okay. Mic Input 1 controls the volume on your microphone. Both Music Input 2 and Mic Input 1 have green lights to indicate they’re in use.
Finally, you can adjust the volume on your Bose speaker. This gives the technologist the option to listen to the same music or audio as the patient. To adjust the volume in the control room, use the knob on the main speaker.
That’s all there is to it
Using your MRI audio system is super easy and greatly improves the patient experience. And don’t worry, we offer optional professional installation at your convenience. Our installation team have all completed Level 1 MRI Safety Training and will be happy to get your set up and running.
Quality, comfortable audio solutions
Our premium sound system is easy to use and scales up based on your needs. Ready to learn more? Click here to download our brochure.